When you bring flash into the scenario, most flashes are daylight balanced, and therefore the "flash" or "daylight" white balance would suffice. But what if you are shooting flash in a room lit by ugly green fluorescents? If you pop flash under the daylight white balance, the subject flashed will be correct colors, but anything lit by the fluorescents, like the background, will be green. We can fix this by using gels on our flashes. A gel is a thin, color piece of transparency that goes over the light, making it that color. So when we are shooting flash in a fluorescent room, we put a green gel over the flash to make all the lights in our photo relatively the same color. That way, in the camera, we can do a custom white balance and EVERYTHING (in theory) should be correctly balanced. Make sense? Well, it's a bit more simple that the actual practice of it. Many lights, especially now with CFLs, are not what we perceive. Fluorescents could be warmer and therefore balanced more like an incandescent. Sometimes they are still the same color, but a warmer or cooler, so a warmer or cooler shade of gel would be required to make it perfect. Getting it perfect is very tricky, but getting all the lights the same color to the best of your immediate ability, is better than nothing. The following photos are two examples. The first shot is made under fluorescents with the daylight balance and no flash. Ugly. The second is made with flash, but the flash is not gelled. Finally, The third is shot under the same fluorescents. While still green under daylight balance, a lighter green gel should have been used, rather than the darker that I used. If you look on the wall behind the girl, you can see the lights on the wall are a semi-pink. They are not balanced perfectly, but better than the previous two shots, no?


Photo © Jason Lenhart
Notice the terrible green tone. This is what fluorescent looks to our cameras.

Photo © Jason Lenhart
Now, in this one, some items in the photo appear to be white. This is flash under daylight. Since many flashes are balanced for daylight, the camera is OK with this. If you look at the background, you can still pick up the green tint. This is from the Fluorescents.

Photo © Jason Lenhart
Here we have the green gel and a custom white balance. Everything, for the most part, looks in balance. You can see the slight pink tones in the background near the lights. I'm not absolutely sure why that happens, but it may be that my gel was too powerful for these lights. Overall, its a much better photo that the other two.
These next two are the before and afters. They are balanced using orange gels under fluorescents acting as incandescent.
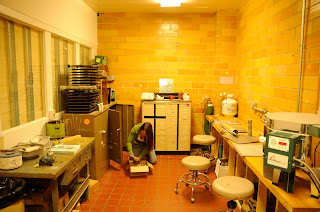
Photo © Jason Lenhart
Incandescent + daylight white balance + no flash = Ew
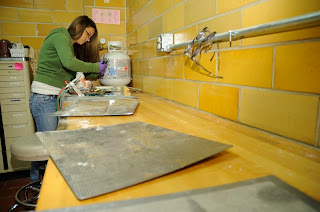
Photo © Jason Lenhart
Flash gelled orange and a much better white balance = better looking photos.
No comments:
Post a Comment