Wednesday, October 29, 2008

Color Correction

Another assignment, right on the back of the single flash one, and just as tricky. In this assignment we learned to balance the color of lights when we use flash. I'll explain. All lights (yes, ALL) have different color temperatures. We don't usually notice, because our brains are adept to adjusting to that. We see something white, and under most circumstances, we recognize it as white. But have you ever been in a room that is just lit really weird, with bad lights, and you can recognize that everything is "kinda orange" or "a little green"? Well, our cameras always see the color that way. It is up to us to adjust for these different color lights using White Balance. White balance basically tells the camera "This is white" and makes it adjust accordingly. We have presets on the camera that will adjust to incandescent, fluorescent, daylight, shade, flash, cloudy, and sometimes more. Many cameras also have an AUTO and Custom (or PRE). In this assignment we focus on the Custom White balance because we are dealing with two lights.
When you bring flash into the scenario, most flashes are daylight balanced, and therefore the "flash" or "daylight" white balance would suffice. But what if you are shooting flash in a room lit by ugly green fluorescents? If you pop flash under the daylight white balance, the subject flashed will be correct colors, but anything lit by the fluorescents, like the background, will be green. We can fix this by using gels on our flashes. A gel is a thin, color piece of transparency that goes over the light, making it that color. So when we are shooting flash in a fluorescent room, we put a green gel over the flash to make all the lights in our photo relatively the same color. That way, in the camera, we can do a custom white balance and EVERYTHING (in theory) should be correctly balanced. Make sense? Well, it's a bit more simple that the actual practice of it. Many lights, especially now with CFLs,  are not what we perceive. Fluorescents could be warmer and therefore balanced more like an incandescent. Sometimes they are still the same color, but a warmer or cooler, so a warmer or cooler shade of gel would be required to make it perfect. Getting it perfect is very tricky, but getting all the lights the same color to the best of your immediate ability, is better than nothing. The following photos are two examples. The first shot is made under fluorescents with the daylight balance and no flash. Ugly. The second is made with flash, but the flash is not gelled. Finally, The third is shot under the same fluorescents. While still green under daylight balance, a lighter green gel should have been used, rather than the darker that I used. If you look on the wall behind the girl, you can see the lights on the wall are a semi-pink. They are not balanced perfectly, but better than the previous two shots, no?
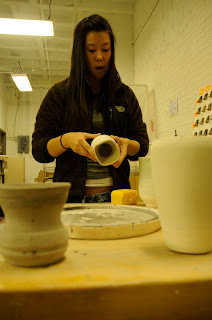
Photo © Jason Lenhart
Notice the terrible green tone. This is what fluorescent looks to our cameras.
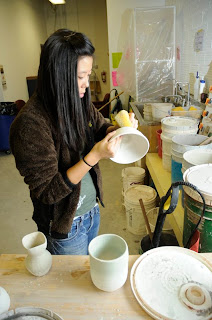

Photo © Jason Lenhart
Now, in this one, some items in the photo appear to be white. This is flash under daylight. Since many flashes are balanced for daylight, the camera is OK with this. If you look at the background, you can still pick up the green tint. This is from the Fluorescents.
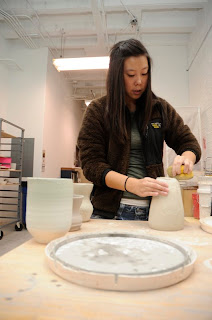


Photo © Jason Lenhart
Here we have the green gel and a custom white balance. Everything, for the most part, looks in balance. You can see the slight pink tones in the background near the lights. I'm not absolutely sure why that happens, but it may be that my gel was too powerful for these lights. Overall, its a much better photo that the other two.

These next two are the before and afters. They are balanced using orange gels under fluorescents acting as incandescent.


Photo © Jason Lenhart
Incandescent + daylight white balance + no flash = Ew


Photo © Jason Lenhart
Flash gelled orange and a much better white balance = better looking photos.

Monday, October 27, 2008

Single Flash

Ok, so flash isn't very pretty for the most part, especially when you've never really worked with one before. For this assignment, we were to go out into the world (right as we got comfy in the studio) and shoot some real "journalistic" stuff. I still struggle coming up with my own things to shoot. It's a skill I have yet to fully develop I guess. Anyway, the assignment was simple. One take shooting an off-camera flash directly at your subject, and one take shooting the much better looking bounce flash. This first shot is a man by the name of Alan Young. He works over at the repair center of Joes Machens Toyota, where I bought my Corolla. He's been chugging away at vehicle repair for 28 years now. This is my attempt to blind Alan.


Photo © Jason Lenhart

Ugh, not so pretty eh? Yea, direct flash has that effect. The next photo is bounce flash. Moral of the story... use bounce flash, it's a lot nicer and you're less likely to blind people. This is the hilarious "Comedy Wars" Improve group that performs every wednesday in Memorial Union. I highly recommend them to beat the "hump day" blues.


Photo © Jason Lenhart

That's single flash. Come back next week to see my sad attempt at color correcting for flash with gels. So far so fail.

Thursday, October 16, 2008

Metal & Glass


Photo © Jason Lenhart

This assignment was another studio assignment and of course right as we get comfortable with the studio, it's our last one. From here on out the photos from this class will be "out there". Anyway, this assignment is aptly titled "Metal & Glass". Why photograph metal and glass? Well, because they are extremely difficult to photograph in the studio. Metal is completely reflective, so unless you're camera sees this reflection, you won't see the metal. Glass, on the other hand, reflects no light, so you have to use two techniques to light Glass. Black line lighting, or white line lighting. Black line lighting means you light the background behind the glass. This gives the edges a "black outline" so to speak. White line lighting requires lights on the immediate sides of the glass object. With a dark background, this gives the edges of your glass and "white outline". With white line you may have to light the top and/or bottom to give the glass definition. Unfortunately I don't have any examples of glass. We shot this assignment with partners and my partner, Anne, got glass so you'll get to see metal.
Like I said, in order to photograph metal your camera needs to be within the group of angles the light creates when it reflects off the metal, otherwise you'll just get a black piece of nothing. Not sure how I came up with the idea for this assignment, but it worked out pretty well. Not perfect but sufficient. No, its not a real pistol (it's a BB gun), yes that is real ammunition, and Incense is how I created the smoke. The modeling lights had to be turned off for periods of time because they were beginning to heat the area up significantly. I'd rather not  have to explain why there are large holes in the ventilation in the studio.